


A disclaimer. I baked sourdough bread before the pandemic.
Bread! I love, love, love it. Both to bake and to eat. I’m not a bread snob. There is a place for bread of all forms in my life and there is nothing like a sliced tomato from the garden and Duke’s mayonnaise sandwich on spongy white loaf bread.
I started baking bread when I was in college. A warm loaf of bread or some cinnamon rolls makes a grand present when you have minimal funds. Through college, working, graduate school and moves across the country, I continued to bake bread.
As a good southern girl, I don’t remember a time when I didn’t know how to make cornbread or biscuits. In a multitude of forms, bread is my go-to when I need to take something to dinner at a friend’s house. Who is going to turn down focaccia? What is better in the afternoon with a cup of tea than an oatmeal blueberry scone? How about some sourdough crackers with that wine and cheese? Warm sourdough tortillas with your fajitas for dinner? Yes to all of the above.
I’ve been thinking a lot about the 30+ years I’ve been baking bread and these are the things that stand out to me.
Baking bread is a science and I’m better at this science than I ever was with physics.
Roasting a chicken or making a pot of bolognese? I’ve made them enough that their preparation is like muscle memory. I know what flavors are likely to work best and I don’t need a scripted recipe to follow. Bread? That is a hard HECK NO. I pull out the scale, wear my glasses and take a lot of notes.
Crafting bread is tactile, but it also requires all of your other senses to be present. The smell of fermentation with a sourdough. The popping sound of hot bread crust when it hits room temperature air. The mouthfeel of an underdone or over-proofed loaf. That taste when you got everything right.
Learning a new bread recipe made me feel like a baby learning to walk: excitement, frustration, moments of failure and then success!
Working with bread of all kinds makes me a better cook. Why? I’m not 100 percent sure, but I know it is true.
The process of baking has drawn me closer to a community of bakers, with whom I’ve shared recipes, tips and problem solved loaves that weren’t quite right.
This point is important to me right now… Bread requires me to be present. During the pandemic when my work almost ate me alive, my trusty sourdough starter, Fred Farter, became my best distraction and gave me the space/time to refocus.
And because it bears repeating, during a pandemic, baking has been a comfort during moments of panic. Every new ingredient I’ve procured or swapped with a fellow baker has helped to distract me from panic-checking the latest virus numbers.
If you have steered clear of breadmaking, the basics are pretty simple. If the bread is leavened, there are essentially two options- baking powder/soda or yeast. With yeast, it begins feeding on the sugars in flour, and releases the carbon dioxide that makes the bread rise. With baking powder or soda, THEY release carbon dioxide gas into a batter or dough through an acid–base reaction, causing bubbles in the mixture to expand and thus leavening the mixture. Tender or delicate bread=baking powder/soda. Textured or chewy bread=yeast. No leverner? Then you have flatbreads or crackers.
When we were getting an inkling of what was coming with the pandemic early last year, I started hoarding all kinds of flour. I get a pantry share from Songbird Farms in Unity every fall, so I always have some of my favorites Abanaki Flint Corn Meal, Red Fife Winter Wheat and Polish Rye. Add to that the 50lbs bags of King Arthur Flour Sir Lancelot Hi-Gluten Flour, White Lily Self-Rising (biscuits!), Ardent Mills King Midas, KA’s Sprouted Wheat Flour and the amazing heritage flours from the Maine Grains Alliance (Sirvinta and Øland are two favorites). I acknowledge that I have a flour hoarding issue and I’m 100% okay with that.
So what forms of bread am I making right now? I made tortillas, shortbread cookies and pita bread in the last week or two. Below are the recipes I followed.
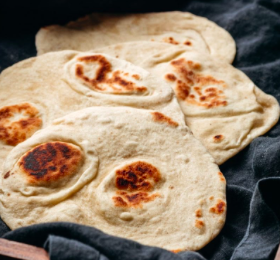
Sourdough Tortillas
(yields 6-12 depending on how larger you need them)
210 g (1 ½ heaping cups) all-purpose flour
7 g (1 ¼ teaspoons) kosher salt
56 g (¼ cup) softened butter
100 g water
100 g sourdough starter
These couldn’t be easier. Combine everything in the bowl of your stand mixer. Using the dough hook, start on low until flour is moistened. Let the mixer work on medium speed until the dough is smooth and not sticking to the sides of the bowl. Cut the dough into 12 pieces for taco- or enchilada-sized tortillas or 6 pieces for burrito-sized tortillas. Shape each piece into a ball. Cover with a very light kitchen towel or plastic wrap. Be careful that your room isn’t too hot. Let the dough rest 30 minutes and up to two hours (at room temperature or 24 hours in the fridge. If you need to store the in the fridge, transfer balls to an airtight container.)
Roll out each ball to about 6 to 8 inches (taco size) or 10 to 12 inches (burrito size) in diameter, or till you can see the counter start to come through — in other words, roll them as thinly as possible.
Heat a 12 inch cast-iron pan (do not add any oil) on medium-high. Lay the tortilla in the pan and cook until it puffs and little brown spots on the underside appear. Turn with tongs or your fingers and cook again till lightly brown. Each tortilla takes about 60 seconds total to cook. If you like a bit of char, keep the tortilla in the skillet until it is charred on both sides. Once the tortillas cool, store them in an airtight bag or container at room temperature for up to 5 days or freeze for up to 3 months.
Note: Your first 3 to 4 tortillas may be on the pale side. This is just likely because your skillet isn’t up to temperature. Once you make a few, you’ll find your rhythm and adjust the heat as necessary depending on if you want more or less char.
Sourdough Shortbread
(Makes 2 dozen)
169 grams all-purpose flour
95 grams buckwheat flour
226 grams butter
125 grams sugar
100 grams sourdough
¼ tsp salt
1 ½ tsp vanilla
Cream butter and sugar. Take your time with this- any recipes that call for creaming butter & sugar means you should scrape down the bowl and the beater several times. I bet it takes me 10-12 minutes to cream butter and sugar. Add sourdough starter and vanilla. Add flour and salt. Once completely incorporated, roll the dough into a log and wrap in plastic wrap. Chill dough at least 2 hours. Preheat to 350F . Slice dough in ¼ inch thick rounds & place on a parchment lined baking sheet. Bake the cookies, one pan at a time, for 10-12 minutes, or until the cookies are dry to the ouch and the bottoms just begin to turn golden.
Adaptations: lemon extract instead of vanilla w/the grated zest of 1 lemon or ¼ c of good cocoa (25g) & use 25 g less AP flour if you go for these chocolate shortbread cookies.
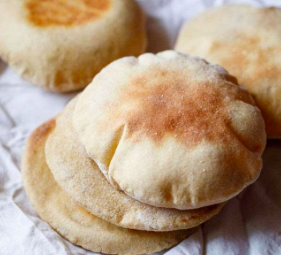
Pita
(makes 10)
4 tablespoons neutral oil, divided (canola, grapeseed, etc)
171 grams (1¼ cups) bread flour, plus extra for dusting
175 grams (1¼ cups) whole-wheat flour
2¼ teaspoons instant yeast
2 teaspoons sugar
¾ cup warm water
¼ cup plain yogurt
1¼ teaspoons salt
In the bowl of a stand mixer fitted with the dough hook, add both flours, the yeast, sugar, water, yogurt and 2 tablespoons of the oil. Mix on low until a smooth ball forms, about 3 minutes. Feel the dough; it should be slightly sticky. If not, add water 1½ teaspoons at a time (no more than 2 tablespoons total), mixing after each addition, until slightly sticky. Let rest in the mixer bowl for 5 minutes.
Add the salt and knead on low until smooth and pliable, 10 minutes. Transfer to a bowl coated with 1 tbsp of oil, forming it into a ball and turning to coat with oil. Cover with plastic wrap and let rise in a warm, draft-free area until well risen but not quite doubled in volume, 1 to 1½ hours .
Dust a rimmed baking sheet evenly with bread flour. Transfer the dough to the counter. Using a dough scraper or knife, divide the dough into 10 pieces (about 2 ounces each). Form each into a tight ball and place on the prepared baking sheet. Brush each ball with ½ teaspoon of the remaining oil, then cover with a damp kitchen towel. Let rise in a warm, draft-free area until well risen but not quite doubled, 30 to 60 minutes. Meanwhile, heat the oven to 500°F with a baking stone on the upper-middle rack.
Place a dough ball on the counter; use a lightly floured rolling pin to roll the ball into a round ⅛ inch thick and 5-6 inches in diameter. Set on a baking sheet dusted with flour (you will need an additional baking sheet or open counter space) . Repeat with the remaining dough balls, placing them in a single layer on the baking sheets. Cover with a damp kitchen towel and let rest for 10 minutes.
Lightly dust a pizza peel with bread flour, then place 2 dough rounds on the peel without flipping them. Working quickly, open the oven and slide the rounds onto the baking steel. Immediately close the door. If you don’t have a peel, use a wide spatula and bake 1 pita at a time. Bake until the breads have puffed and are light golden brown, about 3 minutes. Remove the bread from the oven. Transfer to a wire rack and cover with a dry kitchen towel. Repeat with the remaining dough rounds. Serve warm or room temperature.
Ashley Montgomery is a native Southerner with a deep love for collard greens, hot buttered biscuits and sweet tea. She married a boy from Maine, works at UMF and calls Wilton her home. She loves cooking, feeding people, learning about other folk’s food traditions and will eventually stop being afraid of pressure cookers.
