


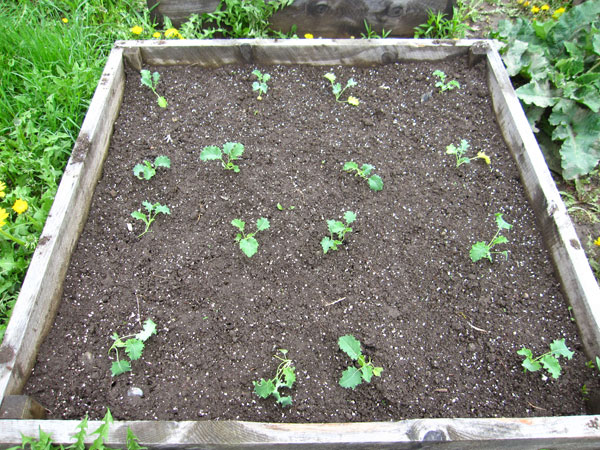
The seasons here in Maine often make it difficult to provide certain plant varieties the amount of summertime sun they require to become as large and productive as we’d like them to be. Starting your seeds a month or two ahead of time indoors allows you to prepare strong, healthy seedlings that are ready for planting in the spring.
Indoor gardening seems elementary enough: plant seeds into some soil, water, then shine a light over the top. However, if you don’t know a couple key things, you’ll discover a lot can go wrong between the time you sow your seeds and when you’re admiring healthy plants later on.
What should my soil consist of? – If you buy your soil, look for something specifically designed for seedlings. Pro-mix from the local hardware store will work, though sometimes it’s pricey. To make your own seedling mix, combine two-parts coco-coir (or peat moss if you can’t find it) with one-part perlite and one-part compost/vermicompost. The compost provides constant nutritional value to the soil but doesn’t burn the delicate roots of the seedling once they start to develop. Coco-coir is favorable because it doesn’t have the underlying acidity that peat moss does; however, be wary of coir’s superb ability to retain water and the possibility of over-saturation, and even worse, damping-off.
What is damping-off? The term damping-off encompasses several fungal diseases which form in a seedling’s presence, causing symptoms such as wilting and collapse of the stem. Probably the number one threat your seedling faces after germination, a seedling is very unlikely to survive once damping-off has taken hold, making it a frustrating and serious problem for gardeners. Though damping-off can be less common during the winter, as fungus isn’t quite as prolific during these months, the use of a heating-pad and/or terrarium can create an environment these fungi thrive in.
Take these steps to avoid damping-off:
- Water from the bottom. Watering from the bottom keep moisture away from the base of the plant and the fragile stem of the seedling. I would recommend watering your plants from the bottom (pouring water into a tray that the containers are in) for the duration of the plant’s stay indoors.
- Don’t over-saturate your medium. The soil you initially plant your seed should be near field capacity, which means you should be able to squeeze a few drops of water out of the soil with your hand if you squeeze firmly. Once the seeds have been sown, I like to give a conservative splash of pH-balanced water (6.5) only where the seeds are in the soil.
- Increase the air flow. Fungus doesn’t like constant fresh air, so by increasing the air flow around your plants you can help discourage damping-off. Especially when the seedlings have emerged from the soil and begin to show their slender stems, make sure fresh air can circulate in and out of your terrarium (open vents or punch holes in the dome portion of the terrarium). If you do not provide this fresh air to your newly emerged seedlings, be ready for the stems to pinch in and collapse and the seedlings to fall over dead.
- Try a top layer of sand. A layer of sand on the surface of your soil helps air movement around base of your plant, which helps to make this vulnerable part of the plant more resistant to damping-off.
Seedlings do not require nutrients like mature plants do. Actually, all the nutrients immature seedlings require to grow are stored up in the seed they emerge from—this means that you should hold off on fertilizing until they have become fully established (no sooner then when the second pair of leaves form). Too soon of a fertilization regiment can be disastrous for young and sensitive plants.
Give your seedlings plenty of light. Shop-lights are great to use for your indoor plants simply because they are convenient and cost-effective. You can use the soft-white bulbs that are extremely affordable at the local hardware store, or you can spend the extra couple dollars for bulbs with a specific color temperature. Just as you might select a warm-colored bulb to illuminate your bathroom, or a cool-colored bulb for the office, you have to make a similar choice for your plants based upon what stage they are in. For seedlings, cool-colored bulbs (with a Kelvin rating between 5,000K and 6,500K) work great because they closely mimic the color temperature of daylight. These are often called “daylight bulbs” right on the package. I have also had success using dual-spectrum shop-lights (one warm-colored bulb and one cool), but if you do this, I would quickly switch over to all daylight bulbs once the seedlings have matured. 14-16 hours per day.

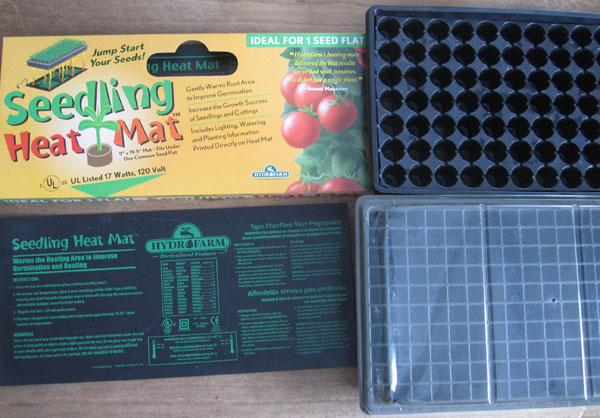
Have a seedling heat mat ready to use. Heat mats are extremely handy to the indoor gardener because it allows us to germinate most of our seeds right in the soil where we plant them, saving us the extra step of germinating seeds separately before we plant them. The heat mat, designed to fit under your typical 11 X 21” seedling tray, keeps the root zone of your seedlings nice and warm, encouraging quick and strong root development. Be extremely careful with these mats, however, because the warmth they produce causes the terrarium to become much higher in humidity, dramatically increasing your chances of the dreaded damping-off. Be prepared to manage the vent on your terrarium (if equipped) when using a heating-pad, and closely monitor your seedlings once they have emerged from the soil.
Propagating a healthy line-up of seedlings during the wintertime isn’t fool-proof, but once you have the hang of it, you’ll become familiar with that special sense of accomplishment gained from watching your seedlings burst from the soil and develop into robust young plants. Just remember, start with a good soil-mix, be careful with watering, and monitor the air flow. Come springtime, you’ll be expanding your outside garden just to find room for all the seedlings you’ve grown!

Great information. Thanks. I’d love to have some advice about what seeds to start when. I do mostly flowers. I think we can start geranium seeds soon, can’t we?
I LOVE spaghetti squash but have never grown it here. Is it relatively easy, and dose it need any special care?
Excellent! I start some of my seeds every year, but I learned quite a bit from this article Sam.
Squashes and other cucurbits are very easy to grow, however they can be prone to transplant shock, so are best started in containers with 2-3 plants (3 seeds) and transplanted as a group with wide spacing. We start ours between mid-March (cukes and melons) and early April (squashes, pumpkins). A lot depends on the microclimate of your garden, 6 weeks to transplant time.
As far as soil, calling it “pricey” is misleading. Seed costs can be pretty high, too, and it’s easy to save a LOT of different herb, flower, and veggie seeds; and none of that creates the risk that mixing your own soil can: the dreaded “damping off”. While this has environmental components mentioned above that can help control various fungi, the reality is that mixing your own soil is often the beginning of the problem. Here at Living Acres in New Sharon, we produce a “living mix”, biologically balanced, all organic greenhouse mix. We sell, through various markets, to thousands of farmers and gardeners for seedling starts every year, and I can’t tell you how many (hundreds) have mixed soil successfully and then had that disaster with severe loss of both money and crop output. They tell us every year that using a professionally made mix is one of the best investments they make for their indoor growing.
Thanks Laura – You should be all set as long as you get them in before the end of the month, though I admit starting geraniums from seed is not my forte!
Squash – They should grow just fine assuming your soil is fertile and well-drained and you plant them in full sun, especially if you start your plants indoors and make sure it’s safe before putting them outside in the spring–(since they have already become established indoors, it’ll better to lose a few days outside making sure frosts and night-time temps aren’t going to be a problem rather than to lose them to exposure). Also, make sure to use a row cover and prepare yourself for cucumber beetles and other harmful insects.
Thanks Rose, happy to help.
Thanks for the input Tony. The growing medium is absolutely the first suspect when it comes to damping-off, after all, it is a soil-borne disease. I assumed, in order to focus on preventative measures, that the pots, growing mediums, implements, and plants were all free of the infection in the first place (as you know that’s easier said than done with soil). If one experiences trouble with damping-off, they should sterilize EVERYthing before they start over (sterilize the growing medium by getting it damp then putting it in the oven at a low temperature for 30-60 minutes–keep an eye on it!–). However, since damping-off fungi exists naturally in practically all of Earth’s natural soil, and plants have been doing “just fine” all this while, remember that it’s not always a matter of whether or not it’s there, it’s a matter of whether or not the disease is empowered by the right conditions. Of course, when you have a growing medium that is less likely/susceptible to be infected, then you’re off to a good start!